• GameEx Online

    Experience interaction.

    More

  • Community

    Get involved and join our vibrant community. Browse our forums.

    More

Instant sheller and shelling guide


The article below was taken from the MAMEworld forums, in case it ever becomes lost.
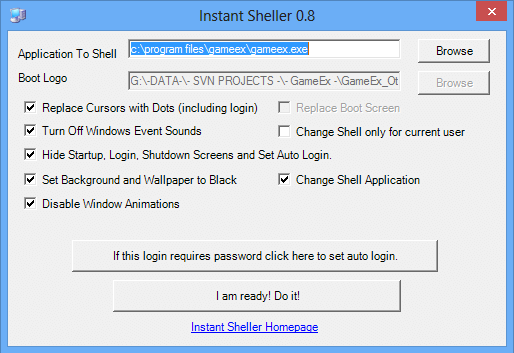
In addition to the guide below I have developed a small application that automates all the process called InstantSheller. It allows you to one click shell GameEx or any other front end. It does “everything” in the guide below automatically. Its for Windows XP Service pack  2 and above, Vista and Windows 7 although for full functionality XP is required. It also requires the .net framework 2 service pack 1 or above. It now also features a one click ‘Undo’.


Download it here.

Use at your own risk, if you have problems post on the forum, but make sure you understand what you are doing here.


InstantSheller


31st May 2018 – Version 0.9

  • Updated for latest Windows 10 Pro and Windows 10 Enterprise. For Windows 10 enterprise the operating system can be completely hidden.


13th November 2012 – Version 0.8

  • A step forward with Windows 7. This version hides the Welcome.. and Shutting Down text.


10th April 2010 – Version 0.7

  • Added Compatibility with Vista and Windows 7.
  • On these operating systems the boot screen cannot be changed and neither can the login screen be hidden.
  • However on Windows 7 The boot screen can be disabled and the login screen background hidden.


5th April 2009 – Version 0.6

  • Added a button to set auto login if user account has a password.
  • Resolves potential issue if application later deleted or moved.
  • Cosmetic fixes.


12th November 2008 – Version 0.51

  • Now disables window animations.
  • You won’t see front ends and applications minimizing and maximizing.


26th March 2008 – Version 0.50

  • Now hides login mouse cursor
  • Ability to not change shell application
  • Upgraded to .net framework 2.


2nd May 2006 – Version 0.40

  • New option to shell only for the current logged in user
  • Added form and application ICONS
  • Done message reminds undo is available


26th November 2005 – Version 0.32

  • Fixes Exception ‘Access to Boot.ini Denied”


19th November 2005 – Version 0.31

  • With version 0.31 you can modify the Windows boot screen. A GameEx image is included.
  • Version 0.31 should also fix the auto login issue after second boot.


5th November 2005 – Version 0.25

  • Features complete undo, After settings set, just launch the program again to undo.
  • Fixes – Sound not disabled on some systems.
  • Sets Desktop background to black


How to completely hide windows, and SHELL directly into a Front-End

Okay, I finally succeeded in hiding windows completely this morning. I’ll give you a quick heads-up!

The first thing that you need to do is get a CmdLine MAME up and running with a good FrontEnd. I use The Dragon King by Howard Castro (mainly coz’ it looks feckin’ awsome and it’s easy to skin! Also, it supports automated shutdown of Windows, YOU REALLY WANT THIS TO HIDE WINDOWS COMPLETELY!)

http://www.oscarcontrols.com/lazarus/

I run this setup under WinXP Pro, simply because the USB support is second to none, you’ll find out what I mean if you stick an I-pac into it! NOTE: this quick guide assumes you are using XP Pro, if not I don’t really know how accurate it will be!

Right, now you’ve got your actual emulator up and running, lets hide that OS!

***PLEASE NOTE*** THE FOLLOWING GUIDE COULD REALLY MESS UP YOUR SYSTEM! MAKE SURE THAT ALL OF YOUR ROMS AND ANYTHING ELSE THAT YOU WANNA’ KEEP HOLD OF IS SAFELY BACKED UP FIRST, I CAN’T BE HELD RESONSIBLE, SO DON’T COME CRYING TO ME!

Right, now that’s outta’ the way, on with the show!

Google for a cursor editing package (shareware will do, you’ll only be using it once!). Install and leave it for the time being. I used this one:

http://www.snapfiles.com/dlnow/dlnow.dll?Inc=No&ID=106645


There’s two ways to get ride of that bootscreen. Use a package designed for it, or make your own.

1. The safest way is to get a program and screen from the net. If you’re not a fan of trial and serious error, this is the way to go, although if you create a custom skin for your FE, you may want them to match! Download BootSkin from Stardock:


http://www.stardock.com/products/bootskin/


And get a decent skin. Either google, or try this one:


http://www.wincustomize.com/download.asp?SkinID=1015&LibID=32


After you install BootSkin, simply double click the downloaded skinfile and apply it. Simple!


2. The second method. Caution, SCREW THIS UP AND YOU MAY BE LOOKING AT A REFORMAT! REMEMBER TO BACK UP YOUR NTOSKRNL FIRST! Now download and install BootEditor. This will give you your custom boot screen. Be aware that you will certain runtime files for this! One of them that I can remember off the top of my head is CMDCTL32.OCX I think. Run the program in compatablily mode for Win2K and any errors will be reported on screen, then just google for the files you need.


http://www33.brinkster.com/userxp/booteditor.zip


**UPDATE** I Just DL’d Ultimard I-Pac utility, and it seems like all the runtime files you need come with it! Just download and install! **Update**


http://www.andywarne.pwp.blueyonder.co.uk/ipd_setup.zip


To create your bootscreen you will need a decent art package. Believe it or not I use Ulead PhotoImpact. Okay, it’s cheap, but it does for most of the basic stuff! The instructions included with BootEditor (you’ll find a readme in the extracted folder, FOR GOD’S SAKE, PRINT, READ, AND READ AGAIN! This can really screw your system up if you cock up!)


Once you’ve created an NTOSKRNL that you’re happy with (by the time you’ve got this far, you should know what I mean!), the only thing you have left to do is actually hide windows itself. Start by going into control panel\sounds and make sure that your default scheme is set to NOSOUND (silent). Open your cursor editor and create a cursor 1pixel in size, and in a dark colour (remember that you may need to be able too see it, a shade of gray will do). Export the cursor you’ve made with a name you can remeber, and place it in the \windows\cursors\ folder, we’ll be coming back to that later!


Now we’re going to disable the startup\shutdown screens.


Change from the default windows XP welcome screen to the older style by going to Control Panels>User Accounts>Change the way users logon or off. Deselect the “Use Welcome Screen” checkbox.


To get rid of the startup and shutdown messages, enter regedit (Start>Run>Type “regedit” without the quotes.). Using the tree on the left, browse through to the following entry:


HKEY_LOCAL_MACHINE >Software>Microsoft >Windows>CurrentVersion> Policies>System


If there’s a DisableStatusMessages dword there, change it to 1, otherwise add it (right click, add dword) and change it to 1.


Now you’ll have to change the background colour of the login screen. Even though you’ve disabled the login, the screen will still load up in blue as it laoding the personal settings. Again, this is a registry hack like before. Browse to the following entry:


HKEY_USERS>.DEFAULT>Control Panel>Colors>Background


The default value of this is an RGB value. For the sake of ease, if you change this to 0 0 0, you will get a black screen.


While you’re in regedit, here’s the final hack:

HKEY_CURRENT_USER \Software\Microsoft\Windows NT\CurrentVersion\Winlogon


Look for a string entry called ‘Shell’. If it is not there, create a string entry and name it ‘Shell’. Set the value of this entry to the name and location of your Front-end. For Dragon King, the shell entry may be “C:\MAME\The Dragon King.exe” or wherever your Frontends executable is located. To repair this if anything happs, bbot via safe mode, go into regedit, and change this value to “explorer.exe”. When you reboot, you will find that you enter windows, and not your frontend! Simple!


Right, now for the cursor! If this isn’t changed at the logon level, you’ll see the mouse cursor for around five seconds while windows loads your personal settings. This really spoils the effect! Download TweakUI:


http://www.systemsmedic.com/DownloadFiles/TweakUIXP.exe


NOTE: I got a newer version of this from MS and it was missing the option that I needed!

Once this is installed, go to Control Panel>Mouse>Pointers and change all of your cursors to the one that you created earlier. Save this scheme as “MAME Single Point Cursor Set” or something. Don’t apply this yet, it’ll make things bloody hard to do!

Right, the last thing to do is finish off making the cursor invisible. Go back to the cursor screen in control panel, load your scheme and hit apply. It’ll be hard to see your cursor, which is why I left this till last! Squint your way into your start menu and open TweakUI. Go to the LOGON option, and somewhere there is the option to copy your wall paper etc. across to the Logon Screen. Hit apply and you’re done!

Restart your machine, and you should no longer notice windows at all! The only thing that really gives it away is the status bar scrolling on the boot screen, but you can get rid of this using BootEditor, but I think it’s handy to have a guide as to whether or not the systems crashed! While you’re in the front end, if you need to revert back to windows, press CtrlAltDelete, enter the task manager (you will have you mouse back at this point, if you can see it, or simply use the keyboard), end your Frontends, click on New Task, and type in explorer.exe. Taa Daa! Windows! Simply navigate to control panel with your invisible cursor (once you hit the start

button things get easier!), and change your scheme back to the windows deault! Do your maintenance, and restart the machine. Back into your FE! Y ou like!?!

Well, that’s how I did it. I think that using TweakUI would be able to sort the screens out the same way as it did the mouse, but I haven’t tried it. If anybody has the time, creating something in VB to make this a ‘Tick The Box’ process should be quite easy I would have thought?

Whilst most of this was put into my own words,I can’t take credit for most of this guide, I found it whilst trying to do the same thing myself! The links were all active at the time of writing this. The original guide can be found here, as well as a full WIP report for a scratch-built cab. It’s indispensible! Check it out, sign the guestbook, and tell ‘im Ritchie sent ya!

http://www.upup.us/old/2003_09_01_old.html

If anyone has any corrections for this, PM me and I’ll edit the post, and give credit of course!

Edited by ritchiethebrit (08/06/04 05:44 PM)